Web Statistics

Thursday, November 30, 2017

Dakota Caramels, A Rumford Complete Cookbook Recipe


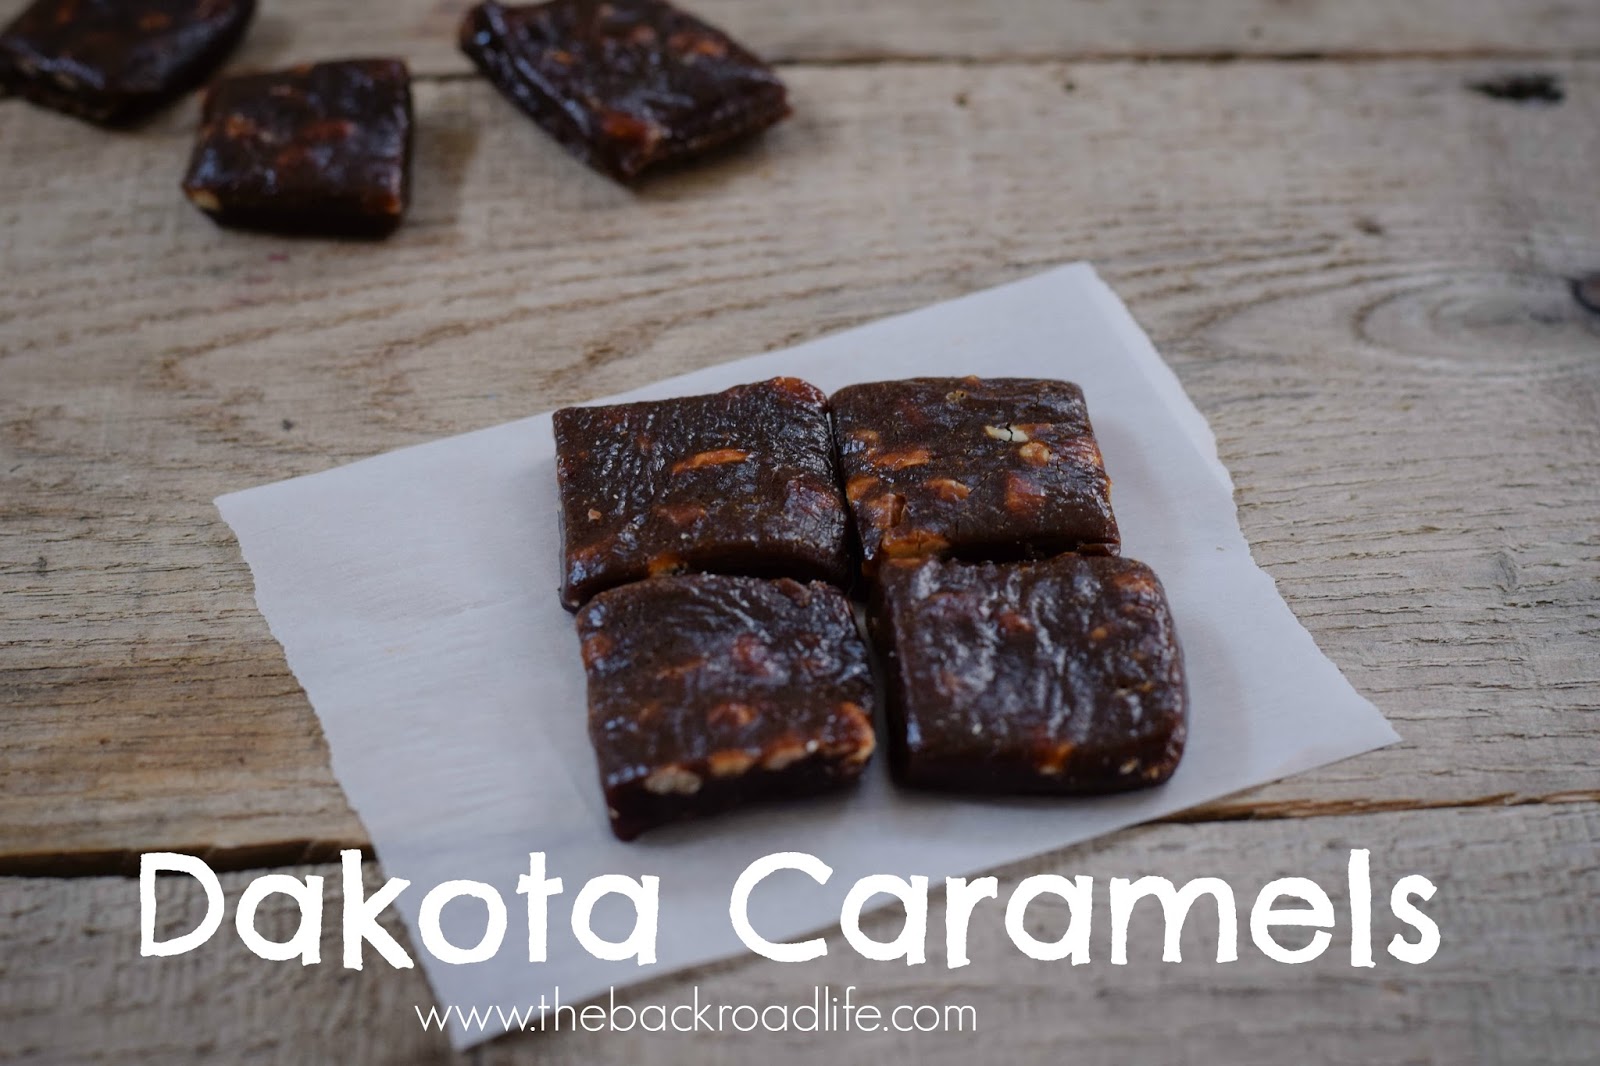
These Dakota Caramels are a perfect addition to make up as part of your holiday treats.


Growing up, my mom always made a large assortment of holiday treats from baking cookies, making caramels and toffees, and preparing chocolate coated treats. I loved to help her with  them, especially my favorites. We would make up trays of a mixture of all the goodies, and deliver them around to our neighbors. This Dakota Caramels recipe reminds me of  those times making all the holiday treats.


The Dakota Caramels recipe is on page 208 of the Rumford Complete Complete Cookbook. Below is a photo of the recipe.


They have a delicious sweet molasses-nutty flavor to them.

Here is my version of the recipe:


Dakota Caramels, A Rumford Compelete Cookbook Recipe

Ingredients for Dakota Caramels:

2 cups brown sugar
1 cup molasses
1/4 lb grated chocolate (I used semi-sweet)
1/2 cup butter
1 cup milk
1 cup chopped nuts (I used pecans)

Directions for Dakota Caramels:

Put all the ingredients, except the nuts into a large pan. Cook at a medium to high heat to bring mixture to a boil. Stir often and continuously boil to bring mixture to a Firm Ball level, 244 to 248 degrees F, on a candy thermometer . After reaching the firm ball level, add in the chopped nuts and stir them in. Then gently pour the mixture into a greased baking sheet and let cool. Cut into bite sized squares when cooled. Wrap each square in wax paper to store.

PRINTABLE RECIPE HERE


This old fashioned recipe is easy to do and the caramels have a great blend of flavors.


This post is sponsored by Clabber Girl but my
 thoughts/opinions are always 100% my own

.

Wednesday, November 29, 2017

Farmer's Omelette


What better way to start your day than with a delicious omelette! We love omelettes for breakfast! Any meal really!


Our family have a different kind of prepared egg often. From scrambled eggs, to eggs over medium, to omelettes everyone in my family has their favorites.

We have a chicken coop full of chickens and the kids love to go out and gather up the eggs.

And there is just something about a bowl full of fresh eggs in all different shades of colors that I love!! Backyard chickens for the win!!


We really love omelettes and different combinations of flavors that you can incorporate in them, but this recipe is probably my favorite combination.

My favorite and go-to combination is this recipe with ham, tomatoes, spinach, chives, and cheese.


I especially like it during the gardening season and we can use fresh produce straight from our garden.


Farmer's Omelette


Ingredients for Farmer's Omelette: 


2 eggs
1/8 cup milk
1/2 teaspoon Clabber Girl Baking Powder
1/4 cup diced ham
1/4 chop spinach leaves
1/4 cup chopped grape tomatoes
1/4 cup shredded cheese
pinch of green onions

Directions for Farmer's Omelette:

Using a greased pan add the ham, spinach, tomatoes, and green onions and start to saute on a low-medium heat.
In a small bowl combine the eggs, milk, and Clabber Girl Baking Powder and whisk together until well blended.
Then add the egg mixture to the pan with the meat/vegetable mixture. Move pan around so egg mixture is evenly spread.
Cook until bottom side is slightly browned and eggs are not runny. The top of the eggs will get some bubbles.
Add shredded cheese on one side of the top of the circle.
Gently fold over one side once. Flip omelette and cook thoroughly.
Place cooked omelette on plate and top off with extra sprinkle of cheese and green onions.

PRINTABLE RECIPE HERE

The egg, spinach, ham, tomato, and green onions combination is my favorite for breakfast creating a delicious farmer's omelette!


So go start yourself a pot of coffee and get cooking!


This post is sponsored by Clabber Girl but my
 thoughts/opinions are always 100% my own


Monday, November 20, 2017

Thankful for the Buddy Seat

I've been around farming my whole life. So many memories created from being in the field.

Riding in the combine with dad.

Meals in the field.

Hay season.

Learning to drive the tractor.

.... and so so much more...

I remember back to my early childhood days riding in the combine with my dad. There wasn't a buddy seat in the combine back then, so we sat on the cab floor a lot, even taking naps occasionally laying on a Carhart coat. My dad created a make-shift buddy seat in the inside of his old Gleaner combine by bolting a board up behind the seat.


These days, I am thankful for the Buddy Seat! Every year I help my dad in the field during hay season and harvest. Much of the time I have at least one kiddo with me. I'm thankful that I can bring them with me.


It makes me so happy that I can raise my family with the same upbringing that my husband and I had. Equipment is more modern now, and technology has advanced a great deal, but they are seeing where food comes from and involved in the process themselves. From planting the seeds, working the ground and to harvest, my kids understand the value of the harvest.

My youngest started trying out the buddy seat at 2 months old. The older kiddos might ride for a few hours after picking them up from school. They are getting a front row seat at full production. I love seeing them enjoy the same type of experience I had as a child.


My childhood memories all carry over into my adult life and I cherish them so much.

Something that I particularly love is the fact that I am able to share those same memories with my kids between our own small farm and helping out with our family's farm.

One of my favorites growing up, jumping the round bale rows. So fun to share the same memories with my kids.


From helping plant seeds in our garden, to doing chores for our farm animals, to riding in the buddy seat in the tractor or combine during harvest, I'm thankful that my children get to experience farm life, even from the buddy seat.


Tuesday, November 7, 2017

Crock Pot Fiesta Corn Dip

There is just something wonderful about a good chip dip!! This Crock Pot Fiesta Corn Dip has a delicious blend of flavors paired together with the right amount of spicy to give it just a little kick. Prepared and cooked in the crock pot for just a few hours, you've got a perfect chip dip ready to go!

A flavorful crock pot chip dip great for all occasions

From tailgate parties, to work carry-in, to appetizers, you won't be disappointed with this Crock Pot Fiesta Corn Dip! Easy to prepare for any type of carry in/party occasion! This Indianapolis Colts Crock Pot is great for game day parties and you can get your favorite team on your crock pot.

A flavorful crock pot chip dip great for all occasions

Every summer we put up several quart bags of sweet corn from our garden. We plant a large amount of sweet corn to sell to our community as well as enjoy corn on the cob ourselves. A year doesn't go by that I don't put up sweet corn for the freezer. Even if some years are less amounts than others. I like to think of new ways to use up our freezer corn throughout the rest of the year. So corn recipes are perfect!!
If you don't have fresh sweet corn in your freezer, canned corn can also be used.

A flavorful crock pot chip dip great for all occasions

A flavorful crock pot chip dip great for all occasions

The corn, bacon, peppers, and cheese are all flavors that pop from this dip creating a super tasty chip dip you'll definitely want seconds of! Grab yourself a bag of tortilla chips and a small bowl of dip and enjoy this today!

A flavorful crock pot chip dip great for all occasions


Crock Pot Fiesta Corn Dip

Ingredients:
Corn, 3 cans of canned corn, or 3 cups of fresh/frozen corn, drained
1 small green pepper, diced
1 jalapeno, seeded and diced
1 can (10 oz) Rotel Original with diced tomatoes and green chilies
1/2 cup green onions, chopped
2 - 8 oz. cream cheese, softened and cubed
2 cups Mexican shredded cheese
1 pack bacon (about 10 slices), browned crispy and crumbled
1 teaspoon minced garlic
1/2 teaspoon chili powder
1/2 cup sour cream
tortilla chips, for serving

Directions:
Cook and brown bacon until crispy. Chop until crumbly and set aside. In the crockpot, add the corn, green pepper, jalapeno, Rotel, and green onions. Then add the cream cheese, shredded cheese, bacon, minced garlic, chili powder, and sour cream. Stir everything together until blended. Cook on high for 1.5 to 2 hours, stirring every 30 minutes. Serve warm with tortilla chips.

PRINTABLE RECIPE HERE

Enjoy for any of your tailgating, cookouts, appetizer, carry-in meal needs!!

A flavorful crock pot chip dip great for all occasions

A flavorful crock pot chip dip great for all occasions


Monday, November 6, 2017

Lemon Snowballs, A Rumford Complete Cookbook Recipe


A lemony sweetness in these moist mini cakes is a perfect little delicate dessert! If you love lemony flavor in a cake, you will love these!


I love lemon recipes. It is such a refreshing flavor. The cheery yellow, the bright taste, and the smell of fresh lemons makes me happy! All of that in light fluffy little cakes, drizzled with a tasty warm lemon sauce.


The Lemon Snowballs recipe is on page 98 of the Rumford Complete Cookbook from 1908. Below is a photo of the recipe.


Here is my version with some revisions.


Lemon Snowballs, A Rumford Compelte Cookbook Recipe 

Ingredients: 
3 eggs
1 cup sugar
3 Tablespoons water
Grated rind from 1 lemon
2 Tablespoons lemon juice
1 cup flour
1 teaspoon Rumford Baking Powder

Directions:
In a bowl beat the yolks of the eggs and the sugar together until light and well mixed.

Add the water, lemon juice, and grated lemon rind.

Then add the flour and baking powder and mix all together well.

In a separate bowl, beat the whites of the eggs until stiff, then add them to the batter mixture and fold in gently.

Grease a mini muffin pan and add about a Tablespoon of batter to each.

Bake at 350 degrees for 10 minutes.

Remove from oven and cool.

Remove from muffin pan and roll lemon cakes in powdered sugar.

Serve with warm lemon sauce.

Lemon Sauce

Ingredients: 
1 teaspoon grated lemon rind
1/2 cup lemon juice
1/2 cup sugar
1 Tablespoon Clabber Girl Corn Starch

Directions: 
In a small sauce pan add the grated lemon rind, lemon juice, sugar, and corn starch. Stir until well blended.

Bring to a boil over medium heat stirring constantly.

Reduce heat to a simmer and cook for an additional 2 minutes, sauce will thicken.

Remove from heat and serve warm.

Refrigerate extra sauce for up to 1 week.


PRINTABLE RECIPE HERE


Delightful, delicate, lemony!


Enjoy!


This post is sponsored by Clabber Girl but my
 thoughts/opinions are always 100% my own